From the zip to your first audio, step by step. The button and menu names in this guide are xtAudio's in English. If your WordPress is in Spanish, switch this page to Spanish.
Would you rather do it with us? If you're a founder, book your free 20-minute kickoff call with the link in your purchase confirmation.
1. Download xtAudio
After you pay, the order confirmation page shows your license key and the "Download xtAudio X.Y.Z" button, if you're logged in to the account you bought with. Your key also arrives in your purchase email, and your key and the download are always in My Account → Licenses at xtrategika.com.
Download the .zip file and don't unzip it.
2. Install it in WordPress
- In your WordPress, go to Plugins → Add New Plugin (in earlier versions, "Add New") → Upload Plugin.
- Choose the zip and click "Install Now".
- Click "Activate Plugin".
The first time you activate it, xtAudio → Getting started opens: a list of 7 steps that check themselves off as you complete them. You can come back to it from the xtAudio menu, which has three sections: Getting started, Convert articles and Settings.
3. Activate your license
Step "Activate your license".
- Paste your key in "License key". It looks like this: XTA-XXXXX-XXXXX-XXXXX-XXXXX.
- Click "Activate".
You'll see "✔ Active on this site" and how many sites you're using, for example "1 of 1 site in use". On a test site you'll see "Test site: it does not use one of your sites." From then on, your license is always in xtAudio → Settings → License.
If you see an error message, look for that message in Support.
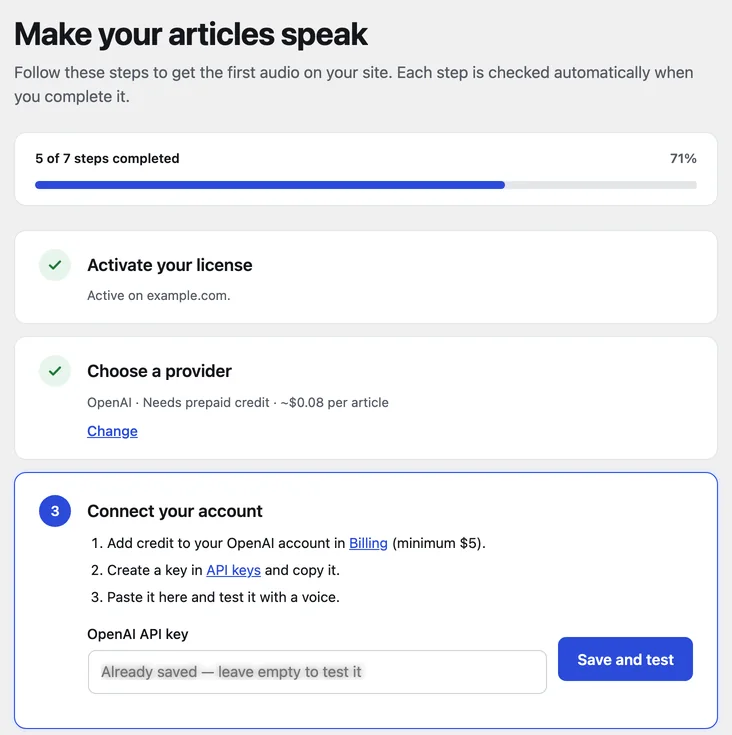
4. Choose a provider
Step "Choose a provider". Each option shows how it works and the approximate cost per article:
- Google Gemini: "Free key in one click · free tier with a daily limit".
- OpenAI: "Needs prepaid credit".
Pick one and click "Save and continue". Later you can set up both in Settings → Provider and voice, and each article's editor will show you the voices of both.
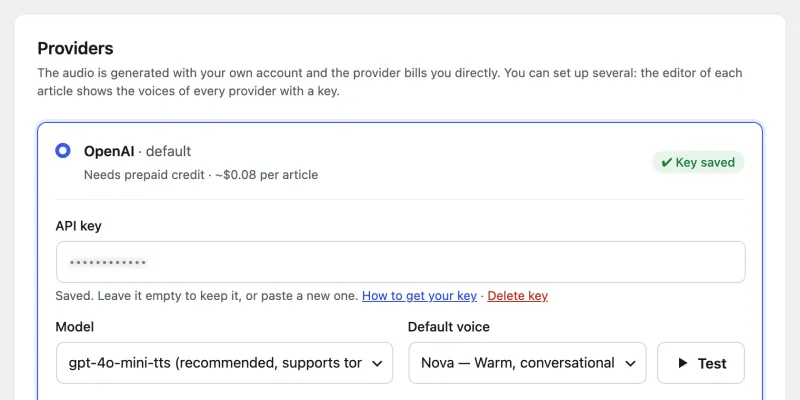
5. Get and connect your API key
Step "Connect your account".
With Google Gemini (it has a free tier):
- Open Google AI Studio and sign in with your Google account.
- Click "Create API key" and copy it.
- Paste it in "Google Gemini API key" and click "Save and test".
When it works, you'll see "Key saved and tested." The free tier has a daily limit, and Google may use the text you send to improve its products. If you prefer the paid tier, enable billing in Google AI Studio.
With OpenAI:
- Add credit to your OpenAI account in Billing (minimum $5).
- Create a key in API keys and copy it.
- Paste it in "OpenAI API key" and click "Save and test".
Your key is stored on your site and is never shown in full again. Don't share it with anyone, including us: we never need it.
For developers: you can also define it in wp-config.php with XT_AUDIO_GEMINI_API_KEY or XT_AUDIO_OPENAI_API_KEY.
6. Choose language and voice
Step "Choose language and voice".
- In "Language of your articles", choose the language they're written in. xtAudio doesn't translate.
- In "Voice", choose a voice. Each one shows its style.
- Click "Test voice" to hear it.
- Click "Save and continue".
With Google Gemini, the voice detects the language from the text and the accent can't be chosen. With OpenAI, the gpt-4o-mini-tts model applies the accent of the language you choose and a tone. You change that tone in Settings → Provider and voice → Default tone. The tts-1 and tts-1-hd models control neither tone nor accent.
7. Choose which content gets audio
Step "Choose which content gets audio".
- Check the content types that will get audio, for example Posts. Next to each one you'll see how many you've published.
- Leave "Generate the audio automatically when an article is published or edited" checked if you want new ones narrated automatically. It only regenerates when the text, voice, language or model changes.
- Click "Save and continue".
8. Generate your first audio
Step "Generate your first audio". You'll see "Your latest article: "…"". Click "Generate now".
A long article is generated in parts ("Generating part 2 of 5…") and joined into a single audio file. With Gemini it takes about 20 seconds per 1,000 characters. When it's done, the step says "Your site already has audio."
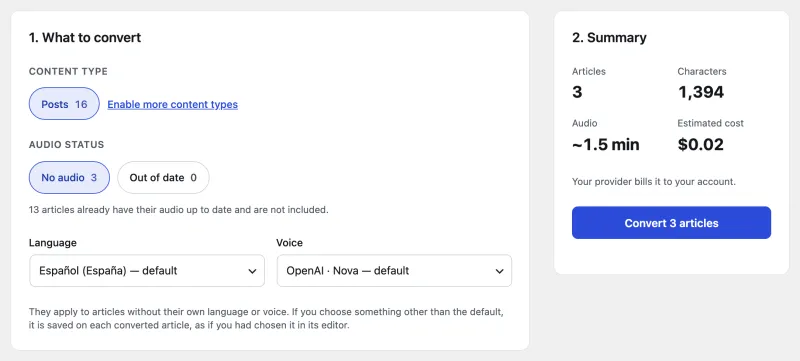
9. Convert your earlier articles
Step "Convert your earlier articles" → "Go to Convert articles" (or xtAudio → Convert articles).
- In "1. What to convert", choose the "Content type" and the "Audio status": "No audio" or "Out of date". Articles whose audio is up to date aren't included and are never paid again.
- If you like, change "Language" and "Voice". They apply to articles without their own language or voice. If you choose something other than the default, it's saved on each converted article.
- Check "2. Summary": articles, characters, minutes of audio and "Estimated cost".
- Click "Convert N articles". You can "Pause" or "Cancel"; audio already generated is kept.
- Keep the page open while it converts. If you close it, the conversion pauses. When you come back you'll see "Conversion paused: X of N left" and click "Continue".
- If an article fails, click "Retry failed".
If you reach the daily limit of Gemini's free tier, the conversion pauses and offers three ways out: continue tomorrow, "Enable billing in Google AI Studio" or "Finish with…" another provider, if you've already set up its key.
10. Automatic generation and the editor box
- Turn it on or off: Settings → Content → Automatic generation → "Generate the audio when an article is published or edited". It starts about a minute after you publish and works in the background with WP-Cron. It doesn't run while importing content or in bulk edit.
- Reading the title: on the same tab, "Read the title at the start of the audio".
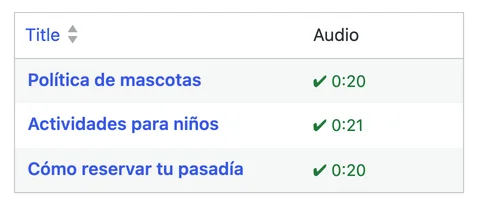
- "Audio" column: the post list shows each post's status: "Up to date", "Out of date", "Error" or "No audio".
- "xtAudio" box in the editor: in each article's sidebar you can choose "Language of the text", "Voice" and "Tone" (the latter only with OpenAI gpt-4o-mini-tts), and click "Generate audio" or "Regenerate audio". If the audio is already up to date, you don't pay again: you'll see "✔ Up to date (no API call)."
11. Where the player appears
Settings → Player → Where the player appears:
- "Above the content"
- "Below the content"
- "Only where you place the [xt_audio] shortcode"
With the shortcode: paste [xt_audio] in the article (Shortcode block) or in Elementor's "Shortcode" widget inside your post template. To show another article's audio, use [xt_audio post="123"] with its ID.
If your posts use a page builder template (for example, Elementor Pro or Beaver Themer), the automatic player may not appear. In that case choose "Only where you place the [xt_audio] shortcode" and place it in the template.
The player only appears when the article already has audio and its content type is enabled.
12. Colors and spacing
In Settings → Player:
- "Space around the player": "Space above (px)" (16 by default) and "Space below (px)" (24 by default). Your theme may add its own spacing.
- "Colors": 9 colors, with a "Paused" and "Playing" preview: Primary color, Accent color, Text on accent, Title text, Secondary icons and time, Progress track, Speed button background, Player background and Player border. If you change your mind, click "Restore default colors".
Click "Save settings". If your site uses caching, clear it to see the change.
13. Test sites
They don't use any of your sites:
- localhost, names without a dot and private IP addresses;
- domains ending in .local, .test, .localhost, .invalid, .example or .internal;
- domains starting with staging., stage., dev., test., testing. or local.;
- preview or staging domains of WP Engine, Kinsta, Flywheel, Pantheon, Cloudways, WordPress.com, GoDaddy, InstaWP, TasteWP, Lando and DDEV.
There the license says "Test site: it does not use one of your sites." Use them only for development and testing, not as a public site or to generate audio for an unlicensed real site. If your host uses a different test domain and it uses up one of your sites, write to us.
14. Moving your license to another site
To free a site, choose one option:
- at xtrategika.com, My Account → Licenses → "Free site";
- on that site, xtAudio → Settings → License → "Deactivate on this site";
- delete the plugin from the WordPress Plugins screen.
Deactivating the plugin on the Plugins screen doesn't free the site. If you deleted it by FTP or the site no longer exists, free it from My Account. The "Manage my sites" button in Settings → License takes you there.
You can make up to 3 changes in any 365-day period (5 with the 5-site license). Freeing a test site doesn't count. If you've used them all, you'll see "This license already used its site changes for this year…": write to us and we'll help.
If you move your site to another domain, the new domain needs its own activation: free the old one and activate the license on the new one.
15. Updates
New versions reach the WordPress Plugins screen on sites with an active license, usually within 24 hours: xtAudio checks our server at most every 12 hours, and WordPress checks for updates on its own schedule. Clicking "Check again" in Dashboard → Updates doesn't speed up that check. If you need it now, download the latest version in My Account → Licenses and upload it in Plugins → Add New Plugin → Upload Plugin: WordPress offers to replace the installed version.
Updates keep coming after your support year. On a multisite network, activate the license on the main site so updates appear in the network admin.
16. If you uninstall xtAudio
If you delete xtAudio from the Plugins screen:
- the API keys saved in the plugin are always deleted;
- the site is freed from your license;
- settings, audio files and their data in your articles are deleted only if you checked Settings → Advanced → When uninstalling → "Delete all xtAudio data".
Without the plugin active, the player doesn't appear.
Stuck? Write to us from Support.